 StarSiftaccount
A stack lines up a night's frames on their stars and averages them: the noise falls with every frame and faint detail comes up. New picture and the workflows stack for you; this page is about stacking yourself, with your own frames, masters and options.
Starting a stack
Right-click a night, a filter or a target in the list on the left and choose Stack…, or select the night and use Stack… in the bar above the frames. + Create → Stack stacks the frames on screen. To stack frames of your own choice, select them in the list with Ctrl or Shift and right-click.
The menu can also stack the good frames and then all of them (or the rejected alone) and compare the two: what the rejected frames cost or add.
The stack dialog
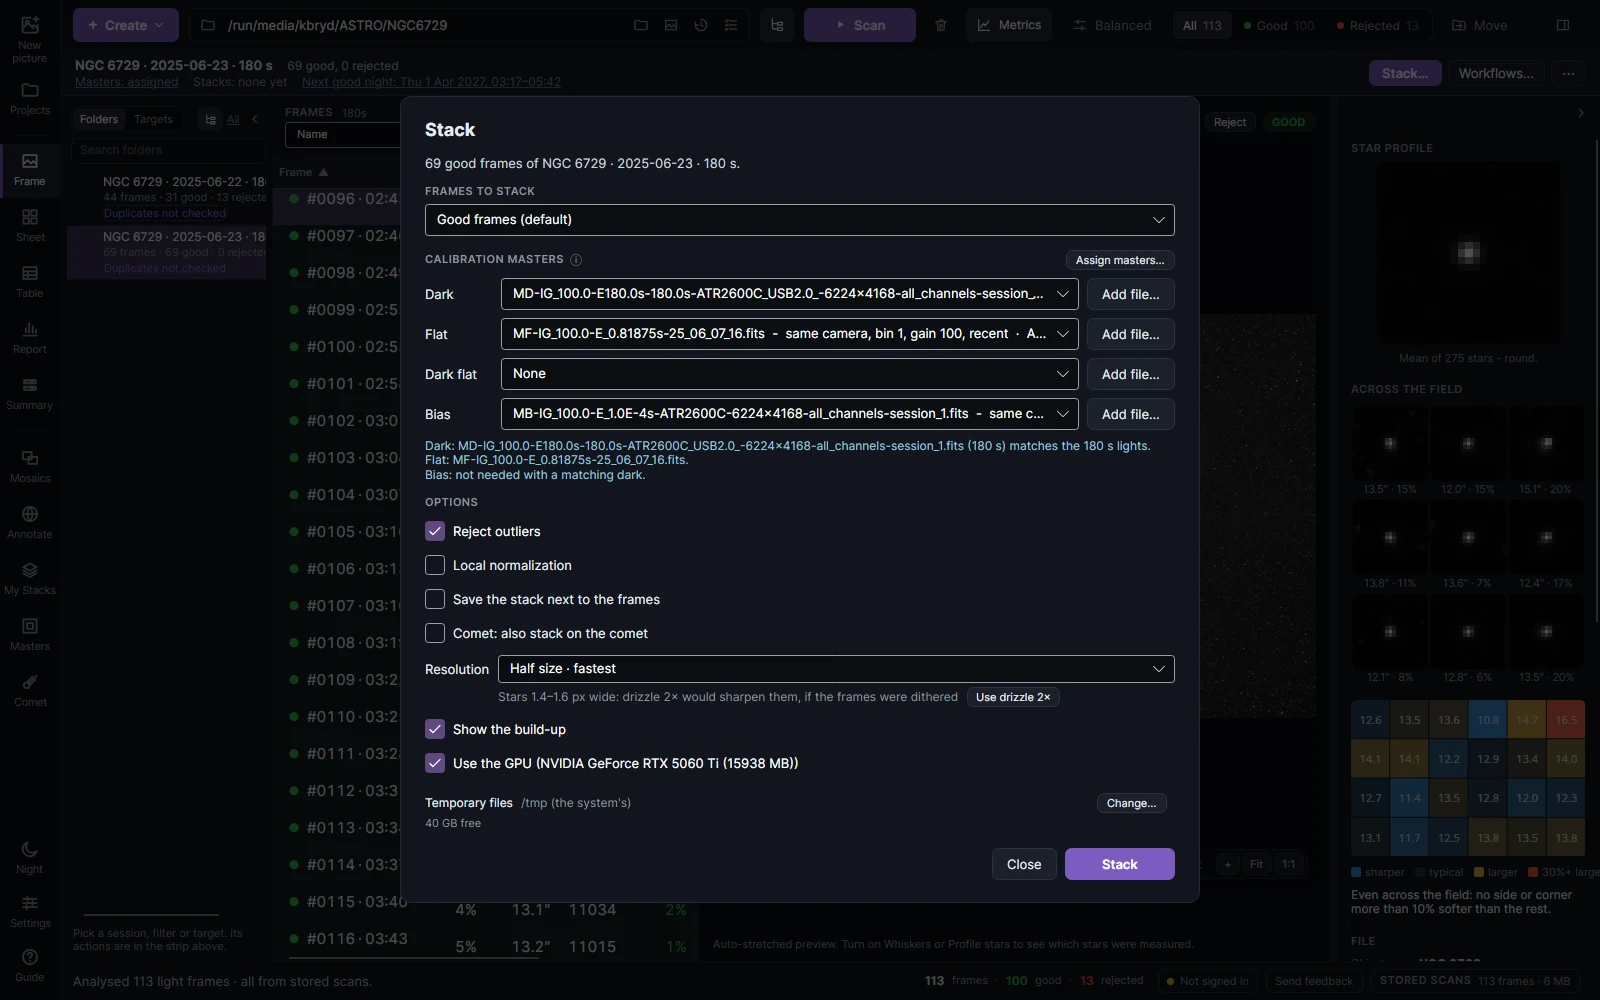
| Option | What it does |
|---|---|
| Frames to stack | Good frames (default) uses the frames that passed screening, with your own marks. All frames or the rejected only are there for comparing. |
| Calibration masters | The dark, flat, dark flat and bias. Each list offers the masters that fit these lights (camera, size, gain, temperature, exposure, filter); the one picked first is the recommended one, or the one assigned to the night. Add file… picks a master from disk and remembers it; Assign masters… finds masters and gives each night its own (see Calibration masters). The lines under the lists say what was picked and why. |
| Reject outliers | Removes satellite trails, cosmic rays and hot pixels (needs three frames or more). Every frame's value at a pixel is judged together, and values too far below or above the median are left out. Bright stars, whose frames differ with the seeing, keep their light. The frames on the reference are kept for this in memory, or in the app's scratch folder when they do not fit (about the size of the frames). Drizzled stacks test each value against the other frames as they go by, and stacks of three take out the one value far from the other two. |
| Local normalization | Matches each frame to the reference tile by tile instead of as a whole: for patchy cloud and nights with different gradients. |
| Save the stack next to the frames | Keeps the stack in a Stacks folder beside the frames. Off, it stays in the app's temporary folder, and the newest are kept for a while (My Stacks). |
| Comet: also stack on the comet | After the stack on the stars, the comet is found and the frames are stacked again on it. See Comets. |
| Resolution | See below. The line under it says whether drizzle would sharpen your stars. |
| Rejection and weighting | Folded away under its own line, as the defaults suit nearly every night; click it to show the settings below. While folded, the line beside it names any setting that is not the default. |
| Show the build-up | Watch the stack grow, and replay it afterwards. |
| Use the GPU | Calibration, alignment and stacking on the graphics card. |
| Temporary files | A big GPU stack keeps its aligned frames here while it runs; choose a disk with room. |
Rejection and weighting
How the frames are combined. The settings are shared with the workflows and New picture, and Defaults puts them back.
| Setting | What it does |
|---|---|
| Rejection | Automatic (MAD), the default: clipping about the median, the spread measured from the median absolute deviation so the outliers do not widen it. Winsorized sigma is the usual choice of PixInsight and Siril and does as well from about ten frames. Sigma is plain sigma clipping, which leaves more of a trail in with few frames. ESD takes out the most deviant values one at a time while each is significant, for 30 frames and more. Median takes the median instead of an average: nothing pulls it, but the stack has about 25% more noise. |
| Cuts (σ) | For the clipping methods: how far below and above the median a value may be before it is left out, in sigmas of the spread (4.0 below and 3.0 above). A lower cut above takes out fainter trails; too low and the brightest stars lose their cores. |
| Frame weights | Noise and sharpness, the default: a frame counts more when its sky is less noisy and its stars smaller, and a hazy frame counts less. Noise only gives the deepest stack. Sharpness first counts the sharp frames much more, for smaller stars and finer detail at a little more noise: for galaxies and small nebulae. Every frame the same is a plain average. |
The methods other than the default run on the processor even in a GPU stack, which adds a few seconds per 25 full-size frames.
Resolution
| Choice | When to use it |
|---|---|
| Half size · fastest | A color camera's default: each 2 × 2 block of the sensor makes one pixel. The least time and memory, and no interpolated color. |
| Full size · fast | The sensor's full size, on the GPU if you have one: about four times the time and memory. |
| Full size · sharper stars (slower) | Full size with smaller, rounder stars, made on the processor. |
| Full size · Bayer drizzle | The raw color mosaic dropped as it is, with no debayering: sharper color, for ten or more dithered frames. |
| Drizzle 2× / 3× | Two or three times the size each way, for undersampled (blocky) stars and dithered frames. |
A mono camera offers its full size and the two drizzles. Drizzle only sharpens stars that span fewer than about two pixels, and only when the frames were dithered between exposures.
Frames from several nights are lined up together, with a correction for the slight curve of the field that a similarity cannot take up when the camera was turned between nights.
Watching it build up
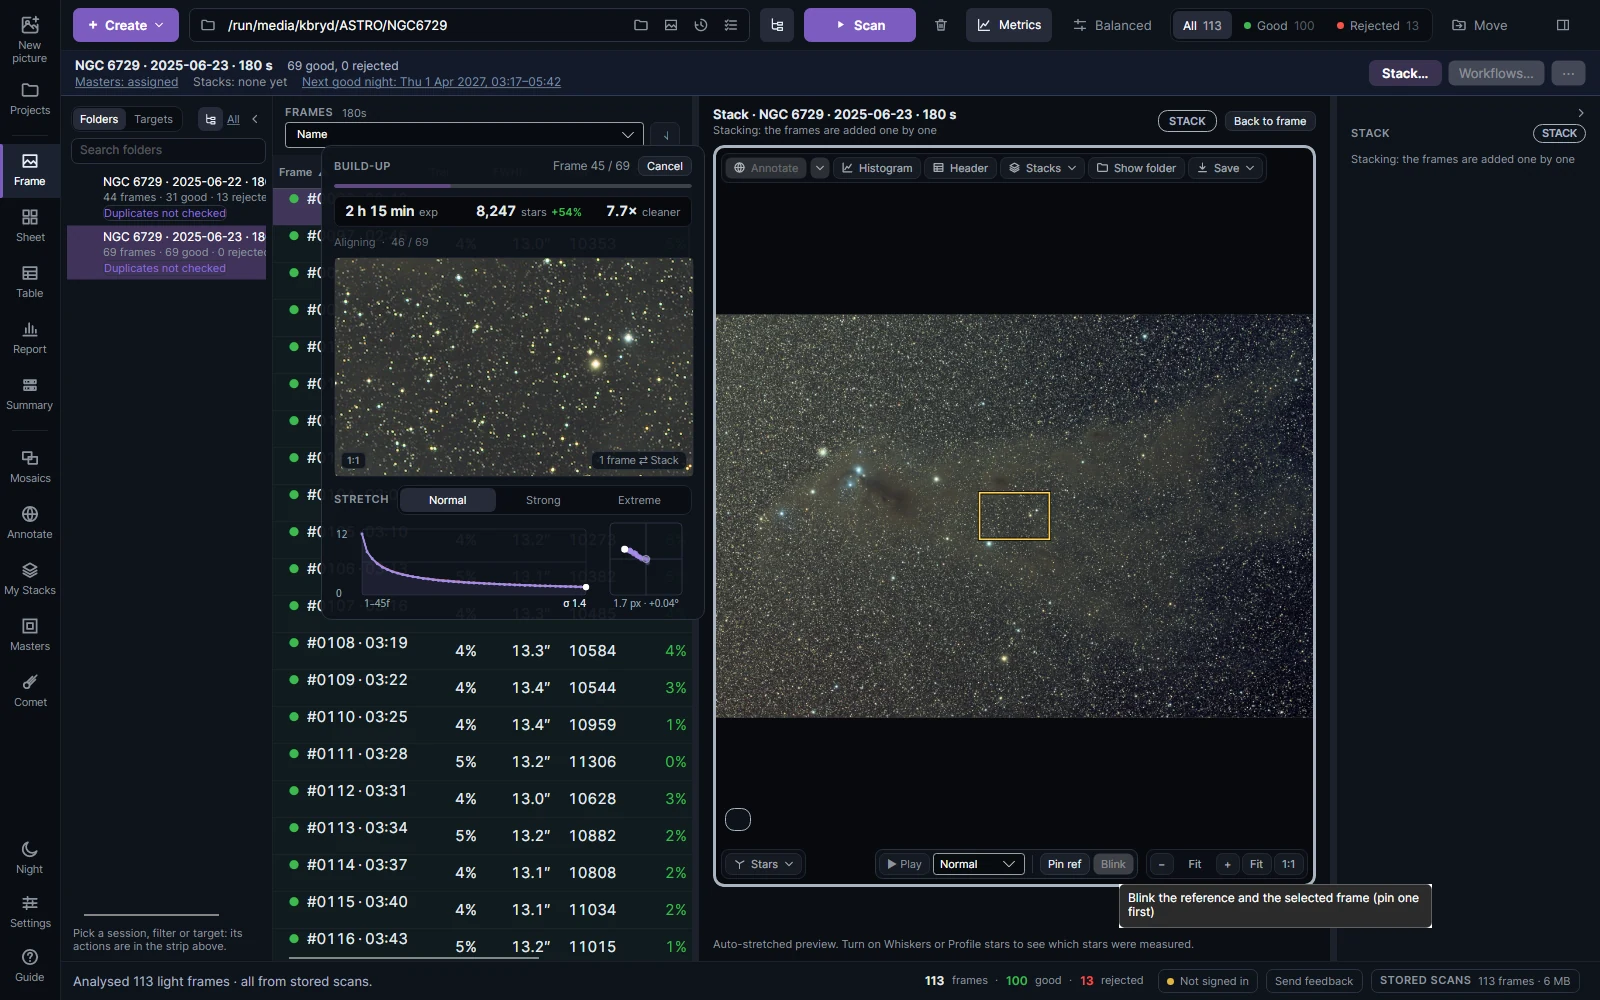
With Show the build-up on, a panel shows the stack after every frame: its exposure, the stars found, and how much cleaner it is than one frame. The noise is measured from the frames themselves, so in a dense star field it is the noise and not the stars; it should fall about as the square root of the frames. The detail crop shows the stack at full size (click the picture to move it), and Normal, Strong and Extreme stretch it harder to judge the faint parts. Below, the noise curve (the dashed line is the best the frames could do) and where each frame pointed. Drag the slider to replay the stack frame by frame.
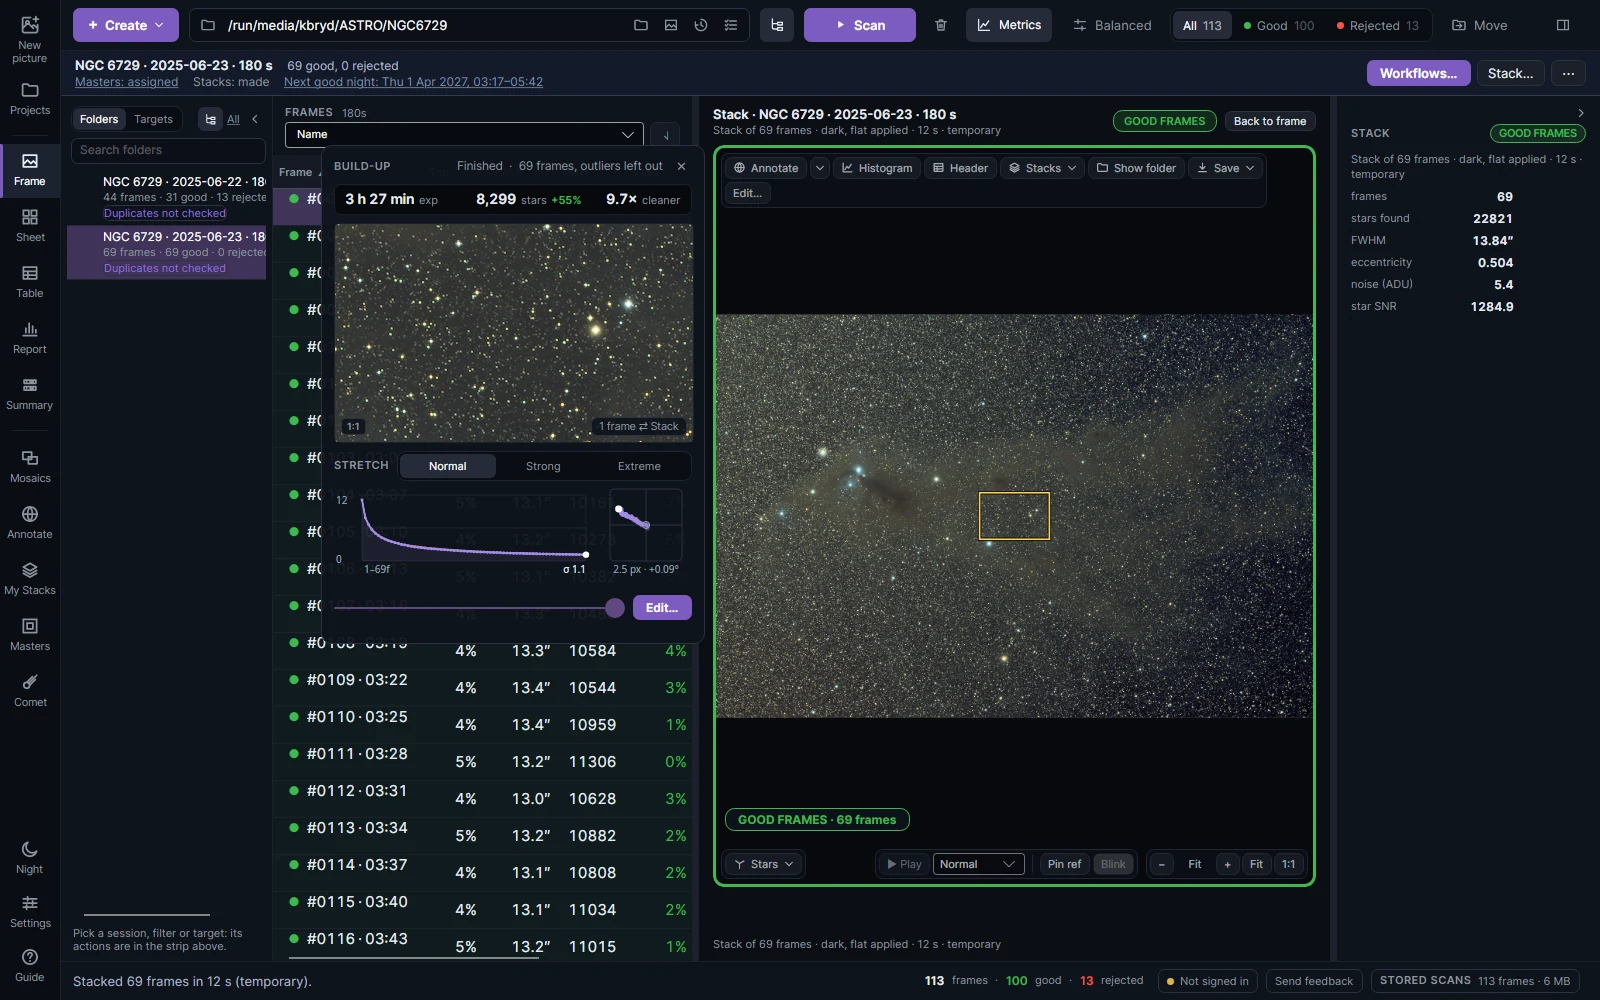
When the stack is done it is shown in the preview with its numbers: frames, stars found, FWHM, eccentricity, noise and star SNR, and the rejection, cuts and weights it was made with. Under them, for a stack just made, how far the frames' weights spread, the frames that counted least, and a frame with many more rejected pixels than the rest (usually a trail or a plane). Edit… opens it in the editor; Back to frame returns to the frames.
Comparing stacks
A night's stacks are under Stacks above the picture. With two of them (good frames and all frames, say), the comparison shows them on the same pixels: Blink flips between them, Slider puts a divider over the picture, and Difference shows B minus A (amber where B is brighter, blue where dimmer). Their measurements are side by side, so you can see whether the rejected frames made the stack deeper or softer.